Tuesday, April 27, 2010

Websites and Words That Are Blocked in China

Websites and Words That Are Blocked in China


There are generally two kinds of internet censorship in China – they either completely block a website from users or they instruct local search engines to modify search results for certain keywords.

For instance, sites like IMDB and BBC are inaccessible from within China and some of them may not even appear in the search results of local search engines like Baidu or Sohu. The next form of censorship is keyword based. If you search for a censored keyword (say “Human Rights”) in a Chinese search engine, you’ll see few or no results.


~

"Registry editing has been disabled by your administrator" Error

Error "Registry editing has been disabled by your administrator" when you open the Registry Editor in Windows Vista

When you attempt to start the Registry Editor (regedit.exe) in your Windows Vista system, you may receive the following message:

Registry editing has been disabled by your administrator


If the above error message is shown in a standalone system, then it may be a result of Malware infection. It is also possible that the DisableRegistryTools policy had been enabled by a third-party tweak program which you may be using. It's highly advisable to follow up with a complete system checkup for Virus and Malware, especially when you're unsure about the cause.

Note: If your system is connected to a domain, your network administrator may have enabled the DisableRegistryTools Policy setting. In that case, you'll need to contact the network administrator to relax this restriction, if need be.

Method 1 - Using Group Policy Editor
If you are using an edition of Windows Vista (Windows Vista Business, Enterprise and Ultimate editions) which includes the Group Policy Editor, follow these steps:

Click Start, type gpedit.msc in the Search box, and press ENTER
Go to the following branch:
User Configuration | Administrative Templates | System

Double-click Prevent access to registry editing tools
Set it as Not Configured

Important: If it's already set to Not Configured, set it to Enabled and click Apply. Then repeat the steps and revert the setting back to Not Configured. This removes the registry based policy if set already.


Method 2
This method should work in all editions of Windows Vista.

Copy the below code & paste in Notepad. Save the file on Desktop & name it reg_enable.vbs.


'Copyright © 2010 Cyber KGB. All rights reserved.
''Description: Resets the "Prevent access to registry editing tools"
' Policy in Windows Vista. If UAC is enabled, this script needs to
' be run from an elevated Command Prompt.
'Compatibility: This script was tested under Windows Vista only.

Option Explicit
Dim WshShell, strUserName, strDomain, strSID
Dim objWMIService, colItems, objItem, arrName, objAccount

Set WshShell = WScript.CreateObject("WScript.Shell")
Set objWMIService = GetObject("winmgmts:\\.\root\cimv2")
Set colItems = objWMIService.ExecQuery("Select * From Win32_ComputerSystem")

For Each objItem in colItems
arrName = Split(objItem.UserName, "\")
strDomain = arrName(0)
strUserName = arrName(1)
Next

Set objAccount = objWMIService.Get _
("Win32_UserAccount.Name='" & strUserName & "',Domain='" & strDomain & "'")
strSID=objAccount.SID

If trim(strSID) <> "" then
WshShell.RegDelete ("HKEY_USERS\" & strSID & "\Software\Microsoft\Windows\CurrentVersion\Policies\System\DisableRegistryTools")
Msgbox "Completed!"
End if


Open an elevated command prompt. To do this, click Start, click
All Programs
, click Accessories, right-click Command Prompt, and then click Run as administrator. If you are prompted for an administrator password or for a confirmation, type the password, or click Allow.
Switch to your Desktop directory by typing the following command, and then pressing ENTER:


cd /d %userprofile%\desktop


Then, type the following command and press ENTER


wscript.exe reg_enable.vbs


Type EXIT to close the Command Prompt window.
If everything worked fine, the DisableRegistryTools policy should have been removed by now. See if you're able to launch Regedit.exe now

Note: If your system is connected to a domain, your network administrator may have enabled the DisableRegistryTools Policy setting. In that case, you'll need to contact the network administrator to relax this restriction, if need be.


~

"This language is no longer available for spell checking" Error

Error "This language is no longer available for spell checking" when using the Spell Checker in Windows Mail

When you use the Spell check feature when composing a new mail message in Windows Mail, the following error message may be displayed:


This happens if the default language is not set in the spell checker options. Follow these steps to resolve the problem:

1. Start Windows Mail

2. From the main screen in Windows Mail, click the Tools menu and choose Options.

Note: In step 2, make sure that you select the Tools menu from the main window, not the New Mail message window.

3. Click the Spelling tab From the Language drop-down, select English even though it's already listed as the default selection, and click Apply.

4. Click OK


~

"Access is denied" - Log off Error

Error "Access is denied" when you try to log off an user account using Task Manager Users tab in Windows Vista

When you use the Task Manager Users tab to log off an user account in Windows Vista, the following error may appear:

User {username} (SessionId=2) could not be logged off. Access is denied.


This happens if Task Manager is not running under administrative privileges. To log off an user account, Task Manager must be run with administrative privileges. Follow one of these methods:

Method 1
Open Task Manager (taskmgr.exe) and click the Processes tab
Click Show processes from all users
When you are prompted for an administrator password or confirmation, type the password or provide confirmation.
Task Manager now runs with administrative privileges.
Switch to the Users tab and log off an user account.

Method 2
Click Start, click All Programs, click Accessories, right-click Command Prompt, and then click Run as administrator.
If you are prompted for an administrator password or for confirmation, type your password, or click Continue.
At the command prompt, type taskmgr.exe, and then press ENTER.
Task Manager starts with administrative privileges.
Switch to the Users tab and log off an user account.


~

Shut Down Quickly via Sleep Button

Shut Down Windows Vista Quickly via Sleep Button

It takes a couple of confusing steps to "Shut down" Windows Vista. You click that Start button, go past the "Power Off" button (since it’s meant for putting your computer in Sleep mode) and then select "Shut Down" from six other options.


Luckily, there’s an easy way to change this default setting and you can use the Power Off button in the Vista start menu to Shut Down and not switch to Sleep mode.

Go to Control Panel –> Power Options –> Change Plan Settings –> Change advanced power settings –> Power Buttons and Lid –> Start menu power button and change the setting from Sleep to Shut Down.


~

Error 0x80070032 when creating a System Restore point in Windows Vista

Error 0x80070032 when creating a System Restore point in Windows Vista

When you try to create a System Restore point in Windows Vista, the following error may occur:


This happens if the Windows Event Log and the Task Scheduler services are disabled. Follow these steps to fix the problem.

1. Click Start, Services.msc. Press {ENTER}

2. Double-click Windows Event Log

3. In the Start type list box, ensure that Automatic is selected

4. Click Start to start the service, if it's not already running

5. Close the Services console

6. Reboot.

It should work fine

If the problem still persists, check the status of the Windows Event Log and Task Scheduler services. If the Task Scheduler service is in a disabled state, then paste code below in a notepad & save the file as schedule.reg.


Windows Registry Editor Version 5.00

[HKEY_LOCAL_MACHINE\SYSTEM\CurrentControlSet\Services\Schedule]
"AtTaskMaxHours"=dword:00000048
"DisplayName"="@%SystemRoot%\\system32\\schedsvc.dll,-100"
"Group"="SchedulerGroup"
"ImagePath"=hex(2):25,00,73,00,79,00,73,00,74,00,65,00,6d,00,72,00,6f,00,6f,00,\
74,00,25,00,5c,00,73,00,79,00,73,00,74,00,65,00,6d,00,33,00,32,00,5c,00,73,\
00,76,00,63,00,68,00,6f,00,73,00,74,00,2e,00,65,00,78,00,65,00,20,00,2d,00,\
6b,00,20,00,6e,00,65,00,74,00,73,00,76,00,63,00,73,00,00,00
"Description"="@%SystemRoot%\\system32\\schedsvc.dll,-101"
"ObjectName"="LocalSystem"
"ErrorControl"=dword:00000001
"Start"=dword:00000002
"Type"=dword:00000020
"DependOnService"=hex(7):52,00,50,00,43,00,53,00,53,00,00,00,45,00,76,00,65,00,\
6e,00,74,00,4c,00,6f,00,67,00,00,00,00,00
"ServiceSidType"=dword:00000001
"RequiredPrivileges"=hex(7):53,00,65,00,49,00,6e,00,63,00,72,00,65,00,61,00,73,\
00,65,00,51,00,75,00,6f,00,74,00,61,00,50,00,72,00,69,00,76,00,69,00,6c,00,\
65,00,67,00,65,00,00,00,53,00,65,00,43,00,68,00,61,00,6e,00,67,00,65,00,4e,\
00,6f,00,74,00,69,00,66,00,79,00,50,00,72,00,69,00,76,00,69,00,6c,00,65,00,\
67,00,65,00,00,00,53,00,65,00,41,00,75,00,64,00,69,00,74,00,50,00,72,00,69,\
00,76,00,69,00,6c,00,65,00,67,00,65,00,00,00,53,00,65,00,49,00,6d,00,70,00,\
65,00,72,00,73,00,6f,00,6e,00,61,00,74,00,65,00,50,00,72,00,69,00,76,00,69,\
00,6c,00,65,00,67,00,65,00,00,00,53,00,65,00,41,00,73,00,73,00,69,00,67,00,\
6e,00,50,00,72,00,69,00,6d,00,61,00,72,00,79,00,54,00,6f,00,6b,00,65,00,6e,\
00,50,00,72,00,69,00,76,00,69,00,6c,00,65,00,67,00,65,00,00,00,53,00,65,00,\
54,00,63,00,62,00,50,00,72,00,69,00,76,00,69,00,6c,00,65,00,67,00,65,00,00,\
00,53,00,65,00,52,00,65,00,73,00,74,00,6f,00,72,00,65,00,50,00,72,00,69,00,\
76,00,69,00,6c,00,65,00,67,00,65,00,00,00,00,00
"FailureActions"=hex:80,51,01,00,00,00,00,00,00,00,00,00,03,00,00,00,14,00,00,\
00,01,00,00,00,60,ea,00,00,01,00,00,00,60,ea,00,00,00,00,00,00,00,00,00,00

[HKEY_LOCAL_MACHINE\SYSTEM\CurrentControlSet\Services\Schedule\Parameters]
"ServiceDll"=hex(2):25,00,73,00,79,00,73,00,74,00,65,00,6d,00,72,00,6f,00,6f,\
00,74,00,25,00,5c,00,73,00,79,00,73,00,74,00,65,00,6d,00,33,00,32,00,5c,00,\
73,00,63,00,68,00,65,00,64,00,73,00,76,00,63,00,2e,00,64,00,6c,00,6c,00,00,\
00
"ServiceDllUnloadOnStop"=dword:00000001
"ServiceMain"="ServiceMain"

[HKEY_LOCAL_MACHINE\SYSTEM\CurrentControlSet\Services\Schedule\Enum]
"0"="Root\\LEGACY_SCHEDULE\\0000"
"Count"=dword:00000001
"NextInstance"=dword:00000001

;CyberKGB


Save the file to the Desktop, and double-click the file to merge the contents with the registry. Click Yes when asked for confirmation.

Restart Windows.

YouTube Video Turned into a Virtual Piano

YouTube Video Turned into a Virtual Piano

Hit the play button, wait until the video loads in your browser and then click any of the piano keys inside the YouTube video itself to play some music.


~

Expand the YouTube Video Player to its Maximum Size within the Browser

Expand the YouTube Video Player to its Maximum Size within the Browser (Not Full Screen)

The default full screen button in the YouTube video player expands the video such that it covers your entire desktop area and all existing windows on the screen stay hidden as long as you are watching the video is this "maximized" state.

But what if you want more control over the size of the YouTube video player, here’s a simple hack – just replace the word "watch" in the URL of any YouTube video with "watch_popup" and the video will expand to fit your browser window, not the desktop.

For instance, if the original YouTube video is located at ..

youtube.com/watch?v=2mrRvUNlq50


the same video can be accessed standalone outside the YouTube website at..


youtube.com/watch_popup?v=2mrRvUNlq50


Resizing the browser window will also resize the YouTube player and you can press F11 in Firefox to mimic YouTube’s full screen mode even with this hack.


~

Login into Facebook With Your Google or Yahoo Account automatically

Login into Facebook With Your Google or Yahoo Account automatically

You can now link both your Google Account (including Gmail) and Yahoo ID with your Facebook profile.


The advantage of linking you other online accounts with Facebook is that if you are signed-in into any of the above services, you’ll automatically be logged into Facebook as well. So for example, if you working in Google Docs or writing scraps in Orkut and then decide to open Facebook in another tab, you won’t see the Facebook sign-in screen anymore.

To set up this association between Facebook and Yahoo/Google Accounts, just go to Facebook -> Accounts Settings and click "Add a new linked account".

Facebook lets you link only one account per web service so choose the ID that you use most frequently on the web.


Click ALLOW , when you see the above message.


~

Watch Adult Videos on YouTube without Logging In

Watch Adult Videos on YouTube without Logging In

Certain videos that contain nudity, explicit language or violence are put under the 18+ category and you can’t watch these videos on YouTube unless you are logged into your YouTube / Google account and click Yes to the following warning:


"This video or group may contain content that is inappropriate for some users, as flagged by YouTube’s user community.

To view this YouTube video, verify you are 18 or older by signing in or signing up."


If you don’t have a YouTube account or don’t want to log-in just for watching a clip that has been flagged as NSFW by other viewers on YouTube, here’s a simple hack:

Replace "watch" in the YouTube URL with "watch_popup" and the 18+ video will play on your screen without restrictions.

Click here for detailed explanation.


~

Convert Office 2007 files to HTML with Gmail

Convert docx and other Office 2007 files to HTML with Gmail

You need no hacks to read those Word 2007 files (docx) files without Office 2007.


Just mail all the Office 2007 document(s) to your own Gmail account and click the View as HTML link near the email attachment to convert those files into text / HTML format that can be viewed in the web browser itself.


This easy conversion method retains the document formatting (no images though) and works with docx, pptx and xlsx Open XML formats.


~

Add a .swf file to a PowerPoint 2007 Presentation

Add a .swf file to a PowerPoint 2007 Presentation

1) Open PowerPoint 2007

2) Make sure you can see the Developer tab in the “Ribbon”. If you can’t, click on the Office menu (The circle button in the top left hand corner), then click on PowerPoint Options, and make sure that you check the Show Developer tab in the Ribbon box.

3) Go to the slide you want the .swf file to appear

4) Click on the Developer tab in the Ribbon

5) Look for the More Controls button in the controls group. It is the one with a spanner and a hammer with three dots underneath it. Once you find it – click on it

6) The More Controls box will appear. Scroll down until you find Shockwave Flash Object. Click on that, then click OK

7) You will notice your cursor is now a cross, and no longer an arrow. That means you can now draw where you want your Shockwave/Flash file to appear on your slide. Simply draw with your mouse, and use the adjustment handles on the box to make sure it is just the right size and position on your slide. When you are done you should see a wireframe box with a big “X” through the middle of it

8) Now we want to link your .swf file into your PowerPoint 2007 presentation. Click on the box you just drew, then right click, and select Properties

9) In the properties box that appears, look for the Movie property, and then add the location of your .swf file (for example c:\temp\test.swf)

10) Quickly run your presentation and watch in awe as your shockwave file hits the big screen in your PowerPoint 2007 presentation


Note: This only LINKS to the .swf file, so if you email or share the presentation with others, chances are the link will break and you will need to go through the above process again to re-link the PowerPoint deck to the .swf


~

Bing Search Tricks

Bing Search Tricks

There are some lesser-known features in Bing that aren’t just useful, you won’t find them in any of the other popular search engines.

1. Watch Video Preview in Search Results
When you hover the mouse over any of the thumbnail images appearing in Bing Video Search, it will automatically play a short preview of the video so you have a good idea about the clip without visiting the target website where that video is hosted.


As you may have noticed in the screencast above, this video preview feature is available for all clip indexed by Live Search whether they are on YouTube, MySpace, CNN or ABC News.

2. Find Web Pages That Link to Documents, MP3s, Videos, ZIPs ..
The contains: operator is Bing Search lets you find web pages that link to other online documents and multimedia files like music and video. This is very different from Google’s filetype: search operator (also available in Live Search) which looks for content inside PDF and Office documents.

For example, if you are looking to download a Microsoft Word report from Gartner site that is about elearning, just type: “elearning site:gartner.com contains:doc”

Similarly, if you like to find all pages on Wikipedia that link to MP3 files, type “site:wikipedia.org contains:mp3″

Another example – to learn about software that you can download from the Google website, use “site:google.com contains:zip OR contains:exe”

3. Save Images & Pictures As Your Search the Web
Live Image Search includes something called a scratch pad that lets you save collection of images with a simple drag-n-drop. This comes very handy if you are searching for images using different keywords and need to shortlist only a few from that large collection.


Note: The image scratch pad feature is not part of Bing.

4. Get Live Search Results as RSS Feeds
While there are external services that let you subscribe to search results via RSS feeds, neither Yahoo! nor Google provide RSS feeds of their search results.

You can however subscribe to search pages from Bing as RSS feed via this undocumented hack. Open Bing Search, type your query and then on the results page, appened “&format=rss” to the URL. See example:

Search Page: http://bing.com/search?q=iphone
RSS Feed: http://bing.com/search?&format=rss
This parameter converts the Live Search page into an RSS feed that you can add to your news reader.

5. Limit Your Search to Website that offer RSS Feeds

Another interesting search operator in Bing Search is “hasfeed” – it lets you find only those web pages that link to RSS feeds. For instance, you could say “micheal phelps hasfeed:” to find web pages that are about “michael phelps” and also syndicate content as RSS feeds.


You can group hasfeed: with other search operators so if want to know about all pages related to movies on ABC website that have feeds, just type “movies site:abc.com hasfeed:”

6. Specify Weight (Preference) in the Search Query
Say you are planning for an upcoming vacation and need some advice related to holiday destinations. Now rather than searching for “holiday destinations” that will return very broad results, you could add the prefer: operator and specify places that you’re really keen to visit though you don’t mind other suggestions.

For e.g., says “holiday destinations prefer:japan”


~

Create Text/ HTML Signature in MS Outlook 2007

Create Text/ HTML Signature in MS Outlook 2007

We all want to be unique in our own way. In other words, we all try to leave our signature in whatever there is as ours. Be it our writes or comments or e-mails a signature makes you stand apart because it has your speciality inscribed. There are many online signature making tools.

But how do we implement them ?
Here is a simple way to do it in Microsoft Office Outlook 2007.

1. From the main Microsoft Outlook window, on the Tools menu, click Options, and then click the Mail Format tab.

2. In the Compose in this message format list, click the message format that you want to use the signature with.

3. Under Signature, click Signatures, and then click New.

4. In the Enter a name for your new signature box, enter a name.

5. Under Choose how to create your signature, select the option you want.

6. Click Next.

7. In the Signature text box, type the text you want to include in the signature. You can also paste text to this box from another document.

8. To change the paragraph or font format, select the text, click Font or Paragraph, and then select the options you want. These options are not available if you use plain text as your message format.

9. To add an electronic business card — vCard — to the signature, under vCard options, select a vCard from the list, or click New vCard from Contact.

10. Click Finish when you are done editing the new signature.


~

Backup Gmail Inbox Online

Backup your Gmail Inbox Online

If you want to backup your emails from Gmail to the local computer, enable POP3 access in your Gmail settings and then use a desktop mail client to download a copy of all your messages from the Google cloud to the local disk.


Why you should backup Gmail to the cloud?

If you are not a huge fan of desktop applications or if you think that setting up a Gmail backup plan involves way too much effort, you can consider creating a backup of your Gmail account in the cloud itself. Before we get into the details, here are three situations where an online backup of Gmail messages will come handy:

Reason #1 – If your main Gmail account gets hacked, you will still have access to all your previous emails.

Reason #2 – If you delete an important email from your Gmail Inbox by mistake, you can easily retrieve it from the online backup. Google Apps Premier has Postini to restore deleted emails, here you’re getting that facility for free.

Reason #3 – If the Gmail service goes down, you will still be able to read your older emails. Gmail outage won’t affect work.


Backup your Gmail Messages Online

There are three services that can help you automatically backup your Gmail (and Google Apps) email accounts online.


The first and most obvious choice is Gmail. Create a new Gmail account and under Settings –> Accounts and Import –> Check mail using POP3 –> Add POP3 email account, enter the email address of your main Gmail account that you want to backup.

Within an hour or so, the online mail fetcher program will pull messages from your main Gmail account and will copy them to your new “backup” account. In my limited testing, I found that Gmail’s mail fetcher left all the messages that were either “read” or have been previously downloaded by another POP3 client so it’s not “true backup.”

That brings us to another alternative – copy your Gmail mailbox to Windows Live Hotmail. While you can add a Gmail account to Hotmail using POP3 (just like Gmail’s mail fetcher), there’s a much better and reliable option out there for copying emails from Gmail into Hotmail and it’s called TrueSwitch.


Setup a new Hotmail account and TrueSwitch, an awesome web-based email account migration service, will copy all your emails and attachments from Gmail to your new Hotmail address. If you have a relatively large Gmail Inbox, the backup process might take up to 24 hours but you’ll get an email as soon as the transfer is complete.

Like Gmail, Hotmail too offers “expanding” storage so it can possibly fit your large Google inbox as well. You can then add your Gmail address to Hotmail (click “Add an email account” in the sidebar) and this will ensure that new messages that land in your Gmail inbox in the future are also saved in Hotmail.

That said, both the services discussed above have one common drawback – they’ll always backup your entire Gmail mailbox and you cannot limit the backup process to a specific set of folders (or labels in Gmail). So if you have a fairly large mailbox and don’t want to backup each and every Gmail folder (or label), try Backupify.


Backupify, can backup your online accounts (including Gmail) to Amazon S3 and a unique point about Backupify is that it lets you specify labels that should be included in the backup process. The messages are stored in the cloud as EML files that you can view inside Outlook or, you can change the .eml extension to .mht, and read the file inside IE.

Backupify supports XOauth so you can add your Gmail account to the service without having to share your Google Account credentials. The advantage is that Backupify will scan your selected mailbox folders every single day for new emails and will archive them automatically.


Note: Try TrueSwitch,Backupify & other 3rd party tools at your own risk.
CosmoCyber is not responsible, if your Gmail account is compromised.


~

Save Multiple Wikipedia Articles to a Single PDF

Save Multiple Wikipedia Articles to a Single PDF

Directly save any Wikipedia page as a PDF file without requiring any extensions or print drivers. In fact, you can even collect multiple Wikipedia pages in a basket and convert them all to a single PDF document (just like an ebook) with just a few mouse clicks.

PDF books generated by Wikipedia are perfectly formatted for printing and they even include all references and citations that are found in the original Wikipedia articles.

To create a PDF from Wikipedia pages, follow these three simple steps:

1. Log in to your Wikipedia account and activate the beta interface.

2. Once the new version is active, start the book creator tool inside Wikipedia.

3. Now open any Wikipedia page that would like to include in your PDF book and click the “Add this page to your book” link. Repeat this step until all the page have been added to the print basket.

4. Once you are done collecting Wikipedia articles, click “Show Book”, give it a title and hit the download button to save your book as PDF.

All PDF books created with Wikipedia are available under the Creative Commons License. And if you have no plans of printing Wikipedia pages, you may still use this trick to quickly download multiple pages from the world’s largest encyclopedia and read them offline on your mobile phone or your iPad.


Wikipedia will store your books collection under your Wikipedia user directory. If you are not happy with the layout of your PDF book or would like to add some more information to the PDF, just edit the template and save the PDF.

For instance, here’s a PDF book on search engines (PDF) that was created from a set of Wikipedia pages using the built-in tools of Wikipedia and nothing else.


~

Hacking Yahoo Messenger & Getting IP

Hacking Yahoo Messenger & Getting IP

While you are chatting through yahoo messenger, Yahoo will hide the IP addresses of all the computers that are connected through the yahoo messenger application to the chat room.So it is not possible to directly find out the IP of the person you want to hack.
Then how to get the IP address?
Yes it is still possible to hack the IP address during the Yahoo messenger chat.

While you are chatting via yahoo messenger the communication between you and the person you want to hack, takes place indirectly via Yahoo server and not directly.It is not possible to hack Yahoo messenger directly to get the IP address. So to hack his IP, you must establish a direct communication with him/her.
So,how to do this ?
It’s easy.

Just start chatting with the person (Whom you want to Hack) via Yahoo messenger. During the process of chatting send him a big file. Now the file transfer takes place directly between your computer and the victim’s computer(via yahoo messenger application).
So now, you are ready to go. Here’s the step-by-step process to hack Yahoo messenger and get the IP address of the person.

Type netstat -n in Command Prompt.

The pic given below shows netstat results of my computer. {When I was not chatting}


Here local address is your own IP and the foreign address is the IP address of the recipient with whom you are connected via yahoo messenger (There may be multiple recipients and hence multiple foreign addresses).

Now send him the file.

Check the output by typing the command netstat -n

Assume the output is something like this.

TCP 127.0.0.10:5101 124.55.23.11:1246 ESTABLISHED

Here 124.55.23.11 is the IP address of the person with whom you are chatting and 1246 is the port number where connection is established.That’s It! You have now hacked Yahoo messenger to get his IP address.

Once you hack Yahoo messenger and get his IP address you can use any of the Remote Administration tools or perform NETBIOS HACKING.

NOTE:
Some times there are chances where in the file transfer gets encrypted (takes place via yahoo server itself).So in this case the above hack may fail to work.


~

View all Rapidshare folders

Use following keywords in Google to view all Rapidshare folders available on internet.


site:rapidshare.com inurl:users "*"

site:rapidshare.de inurl:users "*"

site:rapidshare.com inurl:files "*"

site:rapidshare.de inurl:files "*"

site:rapidshare.com inurl:users (pass|password)

site:rapidshare.de inurl:users (pass|password)


Suppose u need some info on Geography.
Then u can try following keywords to see all Rapidshare folders having any Geography related thing in it

site:rapidshare.com inurl:users "Geo"

site:rapidshare.com inurl:users "Geography"


~

Hack Vista Restore Point to Log On to a System

Hack / Use a Vista Restore Point to Log On to a System

If you've recently set a new password and forgotten it, this is a quick way around the problem.
The only thing is that you must have had System Restore enabled and that you need to remember your previous password.
If this applies, then Insert your Vista installation DVD into your drive and reboot. Start the installation process and designate the system language, the time, and your keyboard format.

At this point the option Repair your PC will pop up, so select that and click Next.
Now select the System Restore option and again click Next. Select the restore point you'd like to use, confirm your selection, and click Finish, then Yes when it's time to restart.
Once the system restarts, close the System Restore process and log on using your older Password.

You may have lost a little bit of data, but the Hack works pretty well.

Note: You can even get the lost data, if your backup process runs often enough you should be able to restore that from your NAS or server.


~

Is Your PC Connecting To Websites Without Your Knowledge

Is Your PC Connecting To Websites Without Your Knowledge

If you are worried that some programs on your PC are secretly making connections to websites in the background, here's a quick tip that uses a simple DOS command to detect and prevent such suspicious activity:

1. Type cmd in your Windows Run box.

2. Type netstat -b 5 > activity.txt and press Enter. After 2 minutes, press Ctrl+C.

3. Type activity.txt on the command line to open the log file in Notepad.


The file activity.txt will have a log of all process that made a connection to the Internet in the last two minutes. It will also show which process connected to which website in this time. And not just the web browsers (like iexplore.exe or opera.exe), the log will also show your IM clients, download managers, email programs or any software that requires a net connection.

Scroll though the activity.txt file and look for any process names or website addresses that you are not aware of.
If you track one , go to the Task Manager (or Process Explorer) to find the location of the executable file on your computer and eliminate the threat.


~

Install an Ancient Printer in Vista

Install an Ancient Printer in Vista

Click Start and enter gpedit.msc to launch the Group Policy Object Editor.
Under Computer Configuration, double-click Administrative Templates and select Printers. In the right-hand pane, find the policy named Disallow installation of printers using kernel-mode drivers and double-click it. Set its status to Disabled.
By disabling the disallow policy, you enable the use of kernel-mode drivers—twisted! Click OK, close Group Policy Editor, and Reboot.

Note: The downside of this setting is that a badly written kernel-mode driver can crash your system; that's what the policy was meant to prevent.


~

MS Outlook 2007 "Color Code"

MS Outlook 2007 "Color Code to Identify Key Messages"

Often when you open your Outlook, your are lost in a zoo of emails while you need the most important one's immediately. What you got to do is color code the important messages so that you can identify the important emails from your seniors, clients, staff or other team members . This saves a lot of time and ensures that you don't overlook the key messages.

Follow the steps below to color code the emails in Outlook

1: Highlight a message from a contact.

2: Choose Tools, then go to Organize. This opens a new window at the top of your Inbox window.

3: Choose the option Using Colors (found at the left of the window).

4: Pick from option, Choose color for selected message and Apply Color.

5: Additionally, you can also pick Show messages sent only to me as a way to highlight messages that are not part of a group distribution.

6: Optionally, choose Automatic Formatting (upper-right corner of window) to view coloring choices or even to apply a different font.

7: Close the Organize window when you are done. All messages in your Inbox from the selected contact are now color coded.


~

Vista Health Report

Vista Health Report

People get physical checkups, and so do computers.
Vista can run a complete and well-organized diagnostic report highlighting potential problems.
In the Control Panel, click System and Maintenance | Performance Information and Tools. In the Tasks list along the left, click Advanced tools. The last item on the resulting list is Generate a system health report.


~

See the translation of a word in Word 2007

See the translation of a word in Word 2007

By using the Translation ScreenTip you can see the translation of most words simply by moving the mouse over them !

Translation ScreenTip works for the following languages:

* Arabic (Saudi Arabia)
* English (United States)
* French (France)
* Spanish (Spain, International Sort)

To turn on Translation ScreenTip:

1) Make sure you are on the “Review” tab of the ribbon

2) Look for the “Proofing” group

3) Click on “Translation ScreenTip”

4) Select the language you want to see the translation for, or click on “Turn Off Translation ScreenTip” to turn the translation off.


~

Decode original long URL from short URL easily

Decode original long URL from short URL easily

Those of you who use social networking services like twitter, facebook etc. know very well that apart from normal use, these social networking is used extensively by spammers for spamming using shortened URLs. These short URLs are created using URL shortening services like bit.ly, cli.gs, digg.com, fb.me, is.gd, j.mp, kl.am, su.pr, tinyurl.com, goo.gl and many more.

These short URLs are often bad as they give you no idea where the actual link goes to and may secretly link to yucky websites, phishing URLs, Malware websites etc. Due to misue of these short URLs, you should be aware of the actual URLS behind the short URL. Even though these short URL services like tinyURL does provide a way to decode the actual URL from short one, but considering the sheer volume of short links going around on web, its almost impossible to go to TinyURl or some other website to decode these links manually everytime.

Hence you need a automated way to decode these links. Long URL Please is a small Firefox Addon which when installed automatically decodes the short URLs on webpages. You need not do anything from your side. Everything is done automatically by replacing any of these links when every web page loads.


This addon supports 80 URL shortening services like bit.ly, cli.gs, digg.com, fb.me, is.gd, j.mp, kl.am, su.pr, tinyurl.com, goo.gl and many more.

Download the add-on here Long URL Please


~

Completely Clear the Web History of IE

Completely Clear the Web History of IE

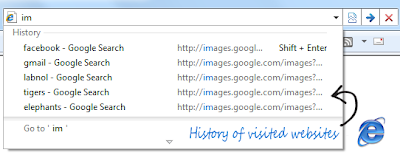
You have cleared your IE history but some previously visited sites still show up in the address-bar of your browser.


Even if you try almost every possible method and that includes resetting the IE browser to factory defaults, removing the registry entries, running CCleaner to delete the stubborn index.dat, clearing the Temp folders manually, disabling add-ons (IE in Safe Mode) but, unfortunately, none of them works.


Some previously visited websites continued to show up in the address bar.

Follow the simple trick to fix the problem.

The address bar in Internet Explorer is integrated with Windows Desktop search by default so even if you clear the IE history, the web entries that are stored in Windows search index will still show-up in the address bar. These entries appear in the same “History” group and hence users (myself included) confuse it with IE’s history.

To prevent web history items Windows Search from completely showing up in the IE address bar, go to Tools –> Internet Options –> Content –> AutoComplete and delete the option that says
Use Windows Search for better results.”


~

Export Email Addresses of all your Facebook Friends

Export Email Addresses of all your Facebook Friends

Search the Facebook Apps directory for something like “export contacts” and you’ll come across quite a few applications that sound as if they can transfer your friends contact information out of Facebook.

There’s an app called “Export Friends” that will save you friends names, city, birthday and their current location in a CSV file that you then import into Excel, Gmail or any other web email program.

The problem is that none of these apps can download what you are looking – The phone numbers and email addresses of your Facebook friends. There are Greasemonkey scripts and other hacks that can pull this information from Facebook through “web scraping” but Facebook Admin, might ban your account forever.

Facebook APIs don’t expose email addresses of users and hence none of the Facebook apps can provide you with the actual contact data of your friends. There’s however a simple (and perfectly legal) workaround that can help you easily download all your friends email addresses from Facebook’s walled garden.


The trick, as you can see in the video, is actually quite simple.

Go to address.yahoo.com and click the Facebook icon. A login dialog should pop-up, just sign-in with your Facebook credentials and within seconds, you entire Facebook address book will be available inside your Yahoo Mail Account. Once the import is done, click this link to download a CSV file with the email addresses of all your Facebook contacts to your desktop.

You can then import the CSV file into Gmail Contacts, LinkedIn, your phone address book or any of the social sites where you want to connect with your existing Facebook circle.

If Yahoo! is unable to import your Facebook Address book, open your Facebook page and choose “Application Settings” under Account. Next remove the “Yahoo! Contact Importer” application from your Facebook profile and try the steps mentioned in the video again.

Note: It doesn’t work if you Facebook account is already linked with Yahoo account. First, remove Yahoo as a “Linked Account” from FB, then go-over the whole process again.


~

Most Contacted Email Addresses in Gmail

Most Contacted Email Addresses in Gmail

Here’s how you can find the list of most contacted email addresses from your Gmail account:


Step 1. Open your Gmail Inbox and click the Contacts link in the sidebar.

Step 2. Click the Export button and choose the “Most Contacted” option in the drop-down to export all those email address in a single CSV file.

Step 3. Save this file to a safe location as you might need it if your Gmail Account is hacked.


~

Mysterious Graphical Handling

Mysterious Graphical Handling

Microsoft Word has a handy feature for manipulating shapes and graphics in documents. When you've placed multiple graphical elements, you can group them so they stay together when you move them and remain the same relative size when you resize them.
But in Word 2007 this feature seems not to work. You can't select multiple graphical items, so there's no way to group them or determine which overlapping objects are in front of which others. !

It turns out that in Word 2007, there's an extra step. Before you start adding graphics you have to define a "Canvas" to hold them.
Click Insert -> Shapes -> New Drawing Canvas.
Add your pictures and shapes to the drawing canvas. Now you can group them, ungroup them, put one behind another, and so on—all the actions that you were accustomed to in Word 2003.


~

Recover Vista's screenshot-snipping tool

Recover Vista's screenshot-snipping tool

The Vista's screenshot-snipping tool Premium, in Accessories very useful.
After the latest update from Microsoft, It might get disappeared.

Vista's screenshot-snipping tool may simply be turned off, or it may be turned on and Windows is ignoring it. Launch Programs and Features from Vista's Control Panel. Click the link Turn Windows features on or off at left. Find the Tablet PC Optional Components box. If it's not checked, check it and click OK. If it is checked, click to uncheck it, click OK, then click to check it again and click OK.
& Reboot.


~